Category Archives: Kitchen Organization

A Lesson in Completion

Image

Well, I did it.  I found a place for my flower-y china, and it doesn’t look half-bad.  I kept a couple of my existing teapots to balance out the flower-power, and I must admit that it is a vast improvement over the previous arrangement on these shelves.  I had attempted to make this area look cute, but it wound up being the catch-all for things we just didn’t want to deal with (next week’s project – dealing with those thing I just don’t want to deal with – haha).  Most importantly, that spot on my bedroom floor where the dishes had taken up residence is now empty.

Image Ta-da!

I learned a lesson here. I tend to be a bit of a perfectionist, which unfortunately, often translates into me just not completing anything. That may seem a bit oxymoronic, but allow me to explain. Whenever I have a project I want to complete I start by thinking about it.  It may take a day, maybe a week, maybe two months . . . then I finally have a perfect vision in my head.  Unfortunately, it is often a little unrealistic.  For example, while trying to decide where to place these dishes I looked at pictures and planned and came up with a glorious vision of the perfect mix between modern, country and antique. However, to realize this look required repainting and wall-papering, sanding down the kitchen cabinets to paint and add pulls, and hey, I might as well re-do the counter-tops, fixtures and floors while I’m at it. I’m only half-exagerating; I really do get carried away. Then reality hits and the perfectionist in me wants to just keep it in that corner until I can “do it right”. Strangely, perfectionists can be quite disorganized for this very reason.

My organizing lesson is: just do it. Just organize those shoes in your closet with or without the perfect California Closets organizer, put those dishes on a shelf even if it isn’t painted the perfect color, place your important documents in the filing cabinet even if you haven’t got that ideal filing system created. I have my life to re-decorate and work out the kinks. If I just do it, I can have order now.

Goals and China

Sometimes I just don’t feel like doing anything.  I don’t feel like changing or pushing or improving or organizing. In such times I just do what I need to in order to keep us all together – keeping the house clean, keeping us fed, keeping our schedules moving . . . It works; things don’t fall apart, but they don’t improve either.  That is where I have been for the past year or so – just doing what I need to keep us together. It’s not laziness. I’ve been plenty busy homeschooling, feeding, and scheduling four kids as well as attempting to be a wife, but I’m ready to step it up again.  I’m ready to start improving and get us functioning once more at our best.

At the beginning of the year it is common to reflect upon the past year and make goals for the upcoming one. 2013 was a good year – we moved into a new home, I had an amazing garden that kept me incredibly busy all summer, boys #1 and #2 started piano, boy #3 learned to read, little girl became “mama” (her words) to a guinea pig name Claw (yup, she’s a girl with 3 older brothers), and I started drinking coffee (that’s good, right?). But as I look around my home, I still haven’t achieved that level of best-function I had in our previous house. I pretty much unloaded the boxes last January, threw things on the shelves, and that is where things have stayed whether or not it works. Other things aren’t functioning to the level I desire either and for better or worse, as mom, it’s all on me – I set the tone, the order/chaos level at home, the schedules. . . This brings me to my goals for this year, 2014 (yes, I realize it’s late January, but whatever). They are:

1) Get my house organized, not just unpacked.

2) Do a little decorating (the boxes with decor, I’m ashamed to say, have sat unpacked for a year in the stairwell closet).

3) Organize and prioritize our family schedule.

3) Feed my family “cleaner” this year (more whole foods and grains, less refined sugars and flours).

4) Run another marathon (I’ve got my sights set on August).

5) Make an effort to connect more with my husband as my “buddy” and love, not just the co-parent.

6) Really enjoy my kids and all the chaos that they bring.

7) Push myself to grow spiritually (memorizing more scripture, becoming intentional about my prayer-life)

Hey, that’s not lofty is it?

So, back to the ole’ blog to chronicle my organizing progress and keep myself accountable and moving forward.  Here’s this week’s project (it’s going to make my husband so happy):

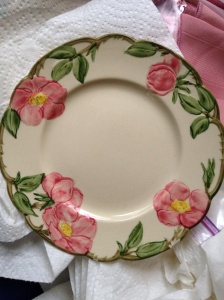
There’s a little backstory here, so hang on folks. My mother-in-“love” (as she likes to say) has three sons. She’s also a dish-lover and inherited three sets of china from her mother. Sons aren’t so interested in china so before her boys left home she determined that set A would go to the wife of the first married, set B to the second, and set C to the third. I’m lucky wife number one, even though I married the middle son. Shortly after our marriage she showed me “my” dishes and informed me that when Paul and I had been married 25 years they would be mine. Well, we celebrated are 15th anniversary last May, and this year my mother-in-love gifted me those dishes 10 years early. Here’s a sample:

Dishes 2

And, here they have sat, on my bedroom floor for the past month.

Dishes 1

Now I have to admit that I’m really not a flowery-pink girl, but I love what they represent; a woman I’ve grown to love dearly and a treasure I will be able to pass on to my daughter to remember her grandmother by (yeah, yeah, I ended with a preposition – so what?). This week, it’s time to get this set off the floor and find it a permanent home in my kitchen. I’ll keep you posted.

Pretty Awesome Zucchini Bread & An Organizing Moment

I think I managed to save my zucchini plant (thanks Kate!). Now I am regularly harvesting zucchini.

Image

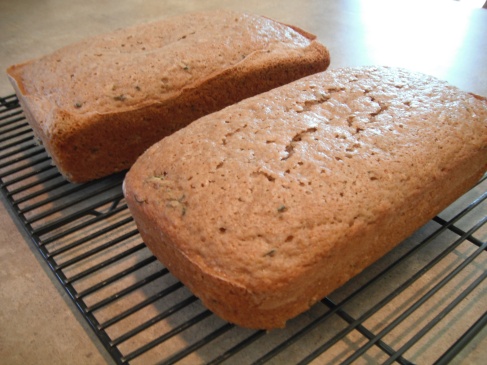
Time for zucchini bread. I have to admit that I have never been a huge fan of zucchini bread, but when I found this recipe in our local newspaper it was different enough that I had to try it. It has become a family favorite. Even my children, who think anything zucchini is disgusting, love it.  I did have to trick them into trying it the first time by telling them we were having “muffin bread”. 🙂  It’s official title is “Zucchini Bread with Walnuts”, but we don’t like walnuts so we call it “Zucchini Bread without Walnuts” or just “Zucchini Bread” (aren’t we clever?).

3 cups self-rising flour

1 T ground cinnamon

1 tsp. grated nutmeg

1/2 tsp. ground cloves (I used Allspice instead because I didn’t have cloves — I don’t know if that is an acceptable substitute, but it tasted pretty good)

1/2 tsp. salt

3 eggs

1/2 cup vegetable oil

1/2 cup milk

2 1/4 cups sugar

1 T vanilla

2 cups grated zucchini

(If you choose – I leave them out) 1 cup chopped walnuts or pecans

Preheat oven to 325 F. Grease 2 (9 X 5-inch) loaf pans and dust with flour.

Sift flour, cinnamon, nutmeg, cloves (or Allspice) and salt into a bowl.

Beat eggs, oil, milk, sugar and vanilla in a large bowl until combined.  Add flour mixture to egg mixture and stir to combine thoroughly. Stir in zucchini (and nuts). Pour into prepared pans.

Bake 45 to 60 minutes, until a wooden pick inserted in the center comes out clean.  Cool in pans on a wire rack 20 minutes. Remove from pans and cool completely before slicing. Makes 2 loaves, 10 slices each.

Image

While making my zucchini bread I realized my spice shelf needed some attention. It didn’t look awful, it was simply difficult to find what I needed without playing the pull-everything-out game.  So while it was in the oven, I started organizing.

Image

At the beginning of the summer my mother-in-law brought me this:

Image

(Thanks Eun!) I’m not sure why I hadn’t used it before, but I pulled it out and started arranging.  I tried to place like things together on one tier, and because I’m kind of nerdy, I also alphabetized each tier (we’ll see how long that lasts 🙂 ).

Image

While I was at it, I kept going and arranged the entire cabinet.  I don’t have a “before” photo, but you can be assured it was not pretty.  Here is the “after”:

Image

My husband was so pleased.  We can find what we are looking for . . . another benefit of being organized.

I’m linking this post up here.

Thrifty Tip Thursday – Use What You Have . . . And Some Pantry Progress (finally)!

My project for the last month or so has been my pantry.  So much for one project per week . . . that’s life! 🙂 I am pleased to announce that I have finally made some progress on that pantry. Huzzah! Here is my terrible, awful, no-good before picture.

Yesterday, I pulled everything out on the food side and sorted according to zones I wished to create in my pantry (as per this Better Homes and Gardens article/slide-show).  I came up with the following zones for my pantry: Baking Supplies, Dry Goods, Snacks, Breakfast Foods, Lunch Foods, Instant Meals/Sides, Condiments, Canned Vegetables, Soup, Small Canned Goods, Other Canned Goods.  I then decided where to place each zone according to use and accessibility.  For example, I wanted the breakfast foods and healthy snacks (cereal, oatmeal, granola bars) to be at a height and location my kids can easily reach, the baking supplies where I can quickly reach, and the junk food snacks as high as possible so my kids cannot easily get to them.  I then used the Better Homes and Gardens printable labels to label shelves and containers, and placed everything back.  I’m not done tweaking things. I have already found two shelf areas I need to switch because of accessibility.  I also need to work on the non-food side of my pantry.  If all goes well, I will accomplish that tonight.  Here is the part-way-through picture.

This brings me to my thrifty tip.  Whenever I begin an organizing project, I start by looking at a multitude of pictures to see what others have done, taking note of ideas I want to incorporate. I’ll be honest, I usually want to go out and buy all kinds of pretty baskets and containers to emulate those magazine-layout-perfect pictures. However, I have committed to being a good steward of our finances and to stick to our budget.  Therefore, I do the next best thing (which sometimes is pretty far from the “best thing”, but worth it in the end) and shop at home.  If you are like me, you have a lot that can be put to use in your own closets and pantries.  For example, I had this little shelf just sitting in a closet not being used:

Now it holds small canned goods.

The basket below was used to hold waaaaaayyyyy too many coloring books. I went through the coloring books, recycled a lot, and placed the others in another basket that was holding just color crayons.

Add a label and it is the perfect home for holding my soups.

I needed a couple small containers for holding my running gels and seasoning packets.

Adding labels to a couple Ziploc containers worked perfectly.

I also re-purposed some Costco pretzel containers for some of my dry goods.

Maybe it’s not magazine perfect, but it’s on the way to being organized and it didn’t cost me a dime!

Thrifty Tip Thursday – A Borrowed Pantry Tip

Image

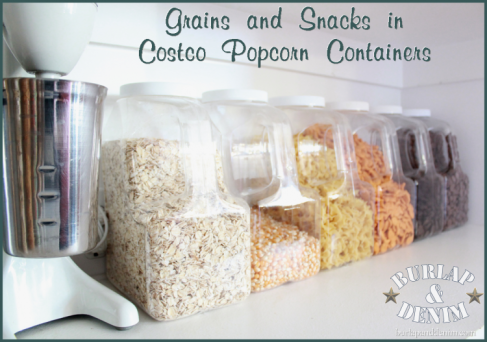
Burlap and Denim re-used Costco popcorn containers to store grains and snacks. The result is a very organized pantry without the extra expense of containers.  I’m collecting my large plastic containers to use similarly. Click the link to view the rest of a very organized pantry.

Pantries to Strive For

Last week of insanity! Last week of soccer, Wednesday night church club, concerts, etc. Then life will calm a bit and I can get back to some organizing. In the mean time, while I’m trying to attack my pantry one baby-step at a time, I thought I would post some pantries I would like to emulate.

This pantry slide-show/article from Better Homes and Gardens is my nominee for most helpful. The slide-show details how to divide your pantry into zones for quick storage and use. Their suggested zones aren’t a perfect fit for my families needs, but zoning is definitely an idea I will be putting to use.  I also want to get one of those under-the-shelf-bread-storage-thingies (I’m pretty sure that is the official title).

This pantry from Burlap and Denim is full or clever storage ideas.  I love her use of baskets for her root vegetables. They actually look decorative stored in this manner. Another favorite feature is her re-use of her Costco popcorn containers to store snacks and grains.

From Lil Blue Boo come these hanging metal storage bins on the pantry wall. I have such a wall that could use some of these. Visit the link for a step-by-step tutorial for creating this look.

The wall of this pretty pantry from Amber Lane Living was created by Mod Podge-ing fabric to contact paper, then placing on the wall. Amazing! It would require a little more time than I am willing to dedicate to this project, but I’m hanging on to the idea for the future. 🙂 I also love all the glass/plastic storage containers. It gives the pantry a very uniform and polished look.

I will never have anything that looks remotely close to this, but I thought this picture posted on Buscut was too gorgeous not to share. I love the look of home-canning. To quote my sister’s comment on Pinterest, “If your cupboard looks like this one day, you are officially superwoman.” Any superwomen out there with pantries like this?

I want a decorative pantry door like this posted on Designer Dad. Sigh. Someday! 🙂

Last, thank you to Julie Loves Home for sharing her pantry makeover with me. Click the link to see her organization process from beginning to its lovely end. I love the large metal bins on the floor. I have some serious work to do!


Organizing My Pantry – 30 Minutes at a Time

I have a rather large pantry and I’m still in a very busy season, so to make the organizing task more manageable I’ve decided to break it into small pieces. Tonight my husband is out of town, so I rented Season One of Downton Abbey, and attacked my basket of table linens. It was full and over-flowing; well past time to sort through, downsize and organize.  That is precisely what I did. There were table clothes that I never used, so they were placed in the donation pile. There were also a few things that didn’t belong in the basket and needed to be placed elsewhere.  I refolded, placed them according to size, labeled and placed them back on the shelf. A simple 30 minute project.  Behold, the “after” pictures.


Much better and the pantry is one step closer to being organized..

Project Updates

There is still one day left to enter my giveaway! Click this link to enter.

It’s Monday. Did you create a Monday “Master List”? I did! There are a couple resources I like for creating schedules or calendars. For a digital/online version I like to use Google Calendar.   It is a calendar that can be personally modified.  I was even able to type recipes for my menu items and make them click-able (only appeared when clicking on said menu item). One of my favorite features is the capability to share with those you choose — make it sharable with your hubby and he can add his schedule to yours! And of course you can sync it with phones and tablets. If you prefer a hard copy you can write on, I love this one from iHeart Organizing.

Find the free download here. This was a perfect “Master List” form for me with my over-view of the week, a spot for a master to-do list and even a place for my menu. I filled it out and added it to my home-management binder for easy access.

I also have an update on my recipe binder.

I can’t say it is completely finished because it is one of those things that will remain a work-in-progress.  Here is an over-view of my layout:

At the front of my binder I placed my favorite meals list.  This is a list, described in an earlier post is my quick reference for meal planning and a guide for finding a favorite recipe.

I used binder dividers to create the following recipe categories:

1 – Breakfast

2 – Lunch/Kid-Friendly Meals

3 – Beef/Pork

4 – Poultry

6 – Meatless/Fish

7 – Vegetables/Sides

8 – Breads

9 – Snacks/Appetizers

10 – Dessert

11 – Cookies ( I love cookies so they have their own spot rather than being added to dessert)

Within each section I added two pieces of colored card-stock — one blue and one yellow.  Behind the blue card-stock I added our favorite recipes that are worth repeating. Behind the yellow card-stock I placed recipes that I have collected and want to try.  After I try the recipe I will either add it to our favorites or toss it. I won’t keep a recipe we won’t eat!


I slid recipes cut from newspapers or magazines, printed from the Internet or even written on recipe cards into page and photo-protectors.


Currently, it all fits in one binder. Eventually I will have to add more binders as I add recipes.

The next couple weeks are exceptionally busy for me, so my organizing theme will be organizing projects to be completed in 30 minutes or less.  I’ll post my first project tomorrow. I have some ideas, but I’d love to hear from you . . . what organizing task can you complete in 30 minutes or less?

My Recipe Binder Update

I spent the afternoon getting my garden prepped for planting. My hands are raw and my backs aches, but it’s so pretty! There something about freshly turned and raked soil. I almost don’t want to disturb it with the planting.

I’ve also been working on my binder. It’s really turning out to be a Menu-planner/Recipe-binder.  Inspired by Decor-ganized Crafts use of a 30 Favorite Meals method, I put together my own list of our 30 favorite meals. The idea is to have 30 staple meals as a go-to list for menu planning. I admit that I don’t have it all together in the menu planning area. Too often I start thinking about dinner around 3:30 when we are finishing up our school day.  To remedy this situation, the first pages of my recipe binder will be our 30 favorite meals list (I may extend it beyond 30. . . I don’t like being restricted), and a monthly menu planner. Here is my list (click on the image to enlarge).

Using “Numbers” (it’s Mac’s version of Excel), I placed the meal titles in alphabetical order.  If the recipe is one that I will not find in the binder, but rather in one of my cookbooks, I made sure to note the title and page number for easy reference. Then for each meal I listed the main ingredients. I didn’t list every ingredient, just those that I may not always have on hand so I have a quick reference for grocery shopping or if I need to find a recipe with specific ingredients. Then I made notes for what I can do to prepare the meal ahead of time, either early in the day or the night before. Next I noted what type of cooking device it would require — crock-pot, stove-top, skillet, oven, etc. Last, I left a section for make-ahead plans in case I am looking for a meal I can make the night or week before and either refrigerate or freeze. It did take some time to put together, but I’m excited about how this will make my meal planning simpler. I don’t want to restrict my family to these 30 dishes alone. I do like to try new meals and I will continue to update my “Favorite Meals” list beyond the 30.

The monthly meal planner will be a sheet I print out at the beginning of each month, and using my “Favorite Meals” list, with the addition of some recipes I want to try, I can make my monthly plans and shopping lists. I started to create a meal planner document, but found some fantastic printable menu planners from Money-Saving Mom, so I’m starting there. I still have some work to do, but I have a good start. If you have any fabulous recipe binder or menu planning ideas, I’d love to hear from you!

Recipe Binder Ideas

Whenever I start a new project I like to see what others have done. To be completely cliche, there’s no need to “reinvent the wheel”. I’m working on a recipe binder this week, so of course I scoured the web to see what I could find. Here are some links from which I’m pulling ideas.

One of my favorite organizing blogs, iheartorganizing, provides her helpful tips for organizing a recipe binder using recipes collected from magazines or printed from online sites.

This binder from prudentbaby.com includes suggested categories, and printable downloads (always a favorite feature for me!).

And then there’s Martha (Stewart). She always has clever ideas, like her above use of photo protecters for recipe cards. A word of warning about the link, it takes you to the beginning of a click-through montage of kitchen organizing tips. This one is number 34 of 47. It is well-worth looking through!

This binder from Flaming Toes absolutely amazed me. I don’t think I have it in me to do this, but if you are crafty there is a detailed how-to for this really cute hand-covered binder.

Here’s another how-to that blew my mind (in a good way) from Crate Paper Blog. They show step-by-step how to make your own binder from the “ground up”.

If you’re like me and you prefer to purchase a binder, I found these from Klassy Kitchen on zazzle.com. Unfortunately I had already purchased mine from Target. I love the design on these.

I realize the above is not a binder picture, but I borrowed a photo from another fun organizing blog I enjoy, My Color-coded Life.  Check out the link to read some good home-organization tips. Number five is her use of a recipe binder to make holidays simpler. . . a really clever idea!

This last binder how-to is my favorite, because it comes closest to what I plan on creating with my binder. From Decor-ganized Crafts, it combines meal-planning with recipe collecting. I have my ideas, now it’s time to start creating.